
Are you tired of being tied to your desktop when you need to access your stored data? Look no further! Nextcloud offers the ability to access your data from anywhere, making it super easy to share files and folders with others. One awesome way to share data is through the „upload only“ file drop option. This allows users to easily upload files to the server through a simple web interface. This feature is great for sharing project data, surveys, and other applications.
But what if you want to access these shares using a script? No problem! It’s actually quite simple to access shared folders with a script. Just follow these easy steps and you’ll be on your way. Happy sharing!
I found this Blog from Georgi Nikolov. He create a script for Linux that can upload data to Nextcloud File-Drop shares using CURL. But I don’t work with Linux. Unfortunately, I have not found an Windows alternative either. That’s why I built one myself.
[Update 2022]
At some point my solution stopped working and could never figure out why exactly. Until Adrian wrote me and presented a solution. The error was because you have to enable TLS 1.2 explicitly. Now the code works again.
Check out his site
Thanks Adrian
the Solution
create File Drop in Nextcloud
To create a „File Drop“ (upload only) in Nextcloud, Login to your Nextcloud server and navigate to the folder that you want to share. Click on the „Share“ button in the top right corner of the page. Select the „File Drop“ or „Allow upload and editing“ option from the dropdown menu. Click on the „Create Share“ button to finalize the sharing process.
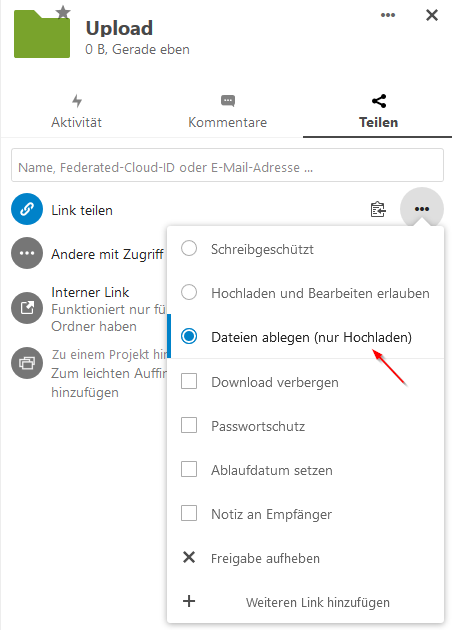
… and copy the shared link url
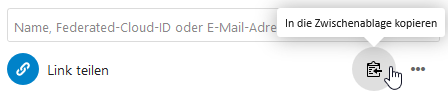
My link looks like this:https://mynextcloudserver.at/xxx/s/Y4cQ2DLJeCAXRLD
We need to separate this URL into two parts. The first part is the NextcloudUrl, the second is the ShareToken.$NextcloudUrl = "https://mynextcloudserver.at/xxx/"
$sharetoken = 'Y4cQ2DLJeCAXRLD'
Now we just need to specify the file for upload.$Item = "C:\Temp\test.zip"
edit and run the script
# Set security protocol to TLS 1.2
[Net.ServicePointManager]::SecurityProtocol = [Net.SecurityProtocolType]::Tls12

# Define the File to Upload
$file = "C:\Temp\test.zip"

# Define authentication information
$nextcloudUrl = "https://mynextcloudserver.at/xxx/"
$sharetoken = 'Y4cQ2DLJeCAXRLD'

# Retrieve file object
$fileObject = Get-Item $file

# Define headers for HTTP request
$headers = @{
    "Authorization"=$("Basic $([System.Convert]::ToBase64String([System.Text.Encoding]::ASCII.GetBytes($("$($sharetoken):"))))");
    "X-Requested-With"="XMLHttpRequest";
}

# Construct URL for webdav endpoint
$webdavUrl = "$($nextcloudUrl)/public.php/webdav/$($fileObject.Name)"

# Upload file to Nextcloud server
Invoke-RestMethod -Uri $webdavUrl -InFile $fileObject.Fullname -Headers $headers -Method Put
Output

File in Nextcloud 🙂
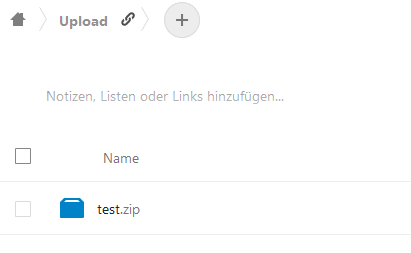
Now we can easily upload files directly to our File Drop Nextcloud link in 2 easy steps.
What happens in the script?
The script first sets the security protocol to TLS 1.2 using the [Net.ServicePointManager]::SecurityProtocol property. This ensures that the connection to the Nextcloud server will be secure.
Next, the script defines the local file to be uploaded, the URL of the Nextcloud server, and the share token that will be used for authentication. It then retrieves the file object and stores it in the $Item variable.
The script then defines a set of headers for the HTTP request that will be used to upload the file. These headers include the authorization header, which is constructed by encoding the share token as a base64 string, and the X-Requested-With header, which is set to XMLHttpRequest.
Finally, the script constructs the URL for the webdav endpoint on the Nextcloud server, using the file name and the URL provided earlier. It then uses the Invoke-RestMethod cmdlet to upload the file to the Nextcloud server, specifying the webdav URL, the local file object, the headers, and the HTTP method (PUT).
How to save and use the script?
To save a script as a .ps1 file and run it, follow these steps:
- Open a text editor, such as Notepad, and create a new file.
- Copy and paste the script into the file.
- Save the file with the .ps1 extension, using a descriptive name that helps you identify the purpose of the script.
- Open a PowerShell window, either by clicking on the Start menu and searching for „PowerShell„, or by using the powershell command in a command prompt window.
- Use the cd command to navigate to the directory where you saved the .ps1 file.
- To run the script, type the name of the file and press Enter. For example, if the file is named myscript.ps1, you would type ./myscript.ps1 and press Enter.
The script will be executed in the PowerShell window, and any output or results will be displayed in the window.
Summary
I hope you had a great time following along with my tutorial on uploading files to Nextcloud with PowerShell. I just love using PowerShell for all sorts of tasks, don’t you? It’s such a versatile platform that allows you to do all sorts of cool things with files and directories, and so much more.
In fact, if you have any other awesome tips and tricks for using PowerShell or Nextcloud, I would love to hear them! Drop me a comment and let me know what you think. I’m always looking for new ways to improve my PowerShell skills, and I’m sure others would be interested in your suggestions too. Thanks for reading!


Hi, nice Articel, but when i try the script i only get
Invoke-RestMethod :
404 Not Found
404 Not Found
nginx
kind regards
Tobias
Hi Tobias,
which Nextcloud version are you using?
404 means that the page was not found.
Please check if the shared link URL or webdav URL works in your browser. At least you should be able to open it.
Thats indeed a nice article unfortunately it doesn’t seem to work for me 🙁
I get a Invoke-RestMethod : The remote server returned an error: (405) Method Not Allowed.
Found some info regarding web application firewall might cause this but even without a firewall in between it doesn’t seem to work.
Hi, I was looking for something to upload automatically data to nextcloud and I landed on this page. I had to figure out how to fix and adapt the above script.
You can see the new updated script here: https://www.gasupport.net/nextcloud/how-to-upload-files-to-nextcloud-with-powershell/
P.S. This is not intended to be spam. I actually pointed my article to yours as the inspiration point.
Hello Adrian,
thanks for your message and your solution.
I have searched for so long on the problem but could not find out what really caused it.
Johannes
I just finished reading the blog post and I have to say, it was an extremely helpful and informative read. I have been looking for a way to easily and efficiently upload files to my Nextcloud instance, and this post provided exactly the solution I was looking for. The step-by-step instructions and accompanying code examples made it easy for me to implement this functionality on my own system. Thank you for sharing this valuable information! I will definitely be referring back to this post in the future.
Hi Johannes. My pleasure to help the community.
My script is a bit more complex but I presented on the website a base script so the users have a starting point in developing their custom script if needed.